Edit Recurring Billings
(Hold, Activate, Skip, and Change Run Dates)
To edit recurring billings you must have access to Account Vaults and Recurring Billings.
This article covers these edit actions for recurring billings:
- Place on Hold
- Activate
- Skip A Payment
- Edit the Next Run Date
- Edit the End Date
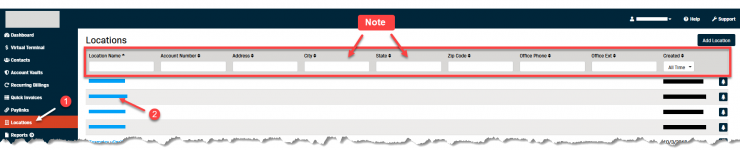
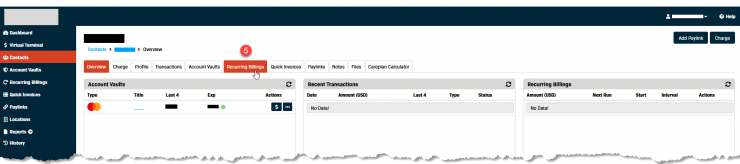
Navigate to the Recurring Billings Screen
To edit recurring billings navigate to the Recurring Billings screen.
- Select Locations from the left-hand menu.
- Click on the Location Name for the correct location.
Note: If you have access to multiple locations you can use the search fields to find the correct location.
- Click the Contacts tab.
- Select the contact that you need to edit.
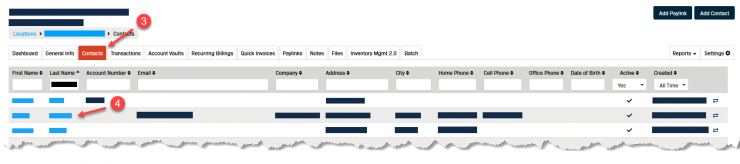
- Click the Recurring Billings tab to open the screen.
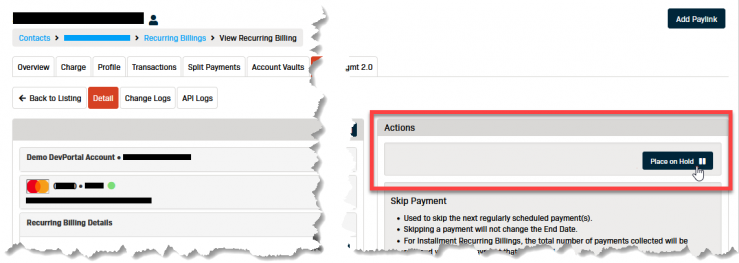
Place on Hold
A Hold can be placed on an Ongoing recurring billing to stop it from running automatically. The Hold will take effect on the date it is initiated and a new transaction will not generate. The recurring billing will remain on Hold until manually Activated again.
Note: Recurring billings that have a set number of recurrences (i.e., not Ongoing) cannot be placed on Hold.
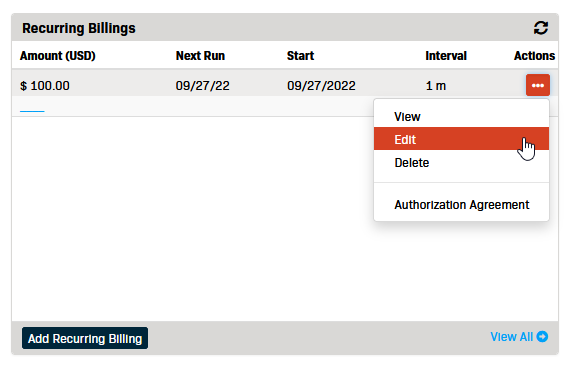
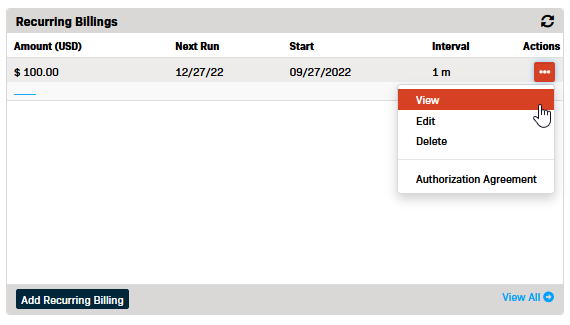
- Click the Actions button (the ellipsis (...)) to the right of the recurring billing you want to place on hold
- Select Edit from the drop-down menu
- Click the Place on Hold button located in the Actions menu
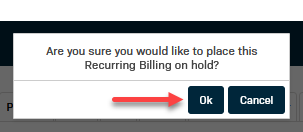
- Click OK in the pop-up box to confirm you want to place the Recurring Billing on hold
Activate
Activate restarts a recurring billing that has been put on hold. If you activate the recurring billing before the next scheduled run date, it will go to the following date.
Example:
- The recurring billing started on 09/09 and runs once a week.
- The account was put on hold on 09/07 and activated again the same day.
- The recurring billing will not run until 09/16. (It will skip the 09/09 payment.)
______________________________________________________________________________________________________________________________________________________________________________________________
- Click the Actions button (the ellipsis (...)) to the right of the recurring billing you want to activate
- Select Edit from the drop-down menu
- Click the Activate button located in the Actions menu
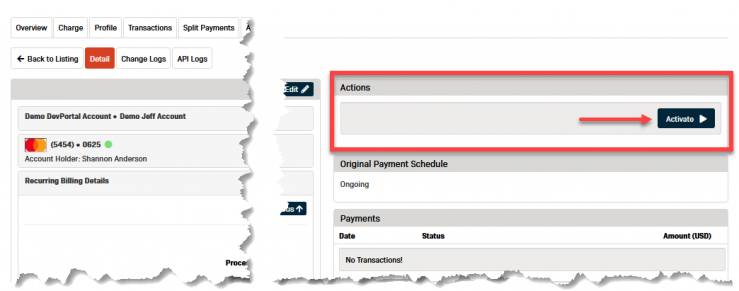
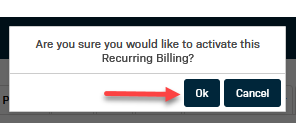
- Click OK in the pop-up box to confirm you want to activate the Recurring Billing
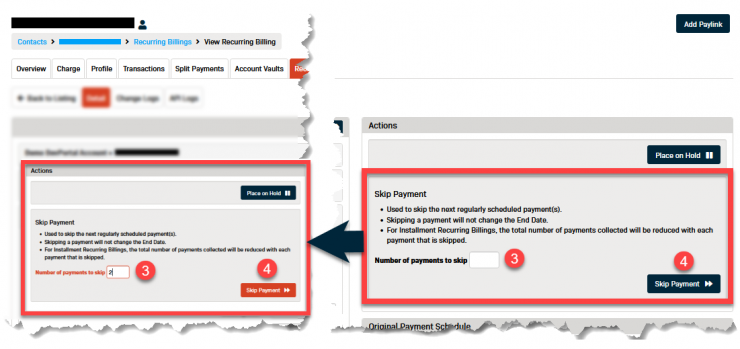
Skip A Payment
You can choose to skip a set number of recurring billings.
Note: The system does not automatically record the payment transaction anywhere. By skipping a recurring billing you are telling the system that you are collecting that payment in another form. (i.e., another payment method, etc. that will need to be entered manually)
Example:
- You have a recurring billing set to run once a week on Friday.
- You set up the recurring billing to skip three cycles.
- The recurring billing will not generate a payment for three consecutive Fridays.
- On the 4th Friday, the recurring billing will resume and generate an automatic payment transaction.
______________________________________________________________________________________________________________________________________________________________________________________________
- Click the Actions button (the ellipsis (...)) to the right of the recurring billing you want to skip
- Select Edit from the drop-down menu
- Enter the appropriate value in the Number of payments to skip field
- Click the Skip Payment button
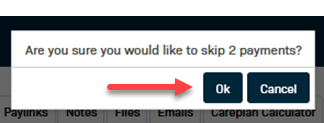
- Click OK in the pop-up box to confirm you want to skip those payments
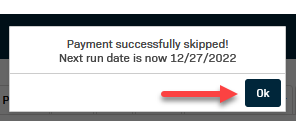
- A message box will pop up with:
- Confirmation the payments have been successfully skipped
- The recurring billing's next run date
- Click OK to close the message box
Edit the Next Run Date
Editing the Next Run Date postpones the date that the next recurring billing will run. Use this method if the customer only needs to postpone the date their next billing will run.
Important Notes:
- Editing the Next Run Date only applies to the next scheduled billing. After the selected "next run date" passes, the recurring billing will resume its original schedule.
- You can set the "next run date" to any day between:
- the day after the current Next Run Date
AND - the day before the following recurring billing Run Date
- the day after the current Next Run Date
- You can set the "next run date" to any day between:
- Editing the Next Run Date DOES NOT skip a billing, it only delays when it will run.
*** If you want to skip a recurring billing see the Skip a Billing section above. ***
Example:
- The recurring billing runs once a month on the 23rd.
- Today is September 9th.
- The "next run date" can be set to any date between the 24th of September and the 22nd of October.
- The current recurring billing (September 23rd) will run on the new date you select, and the next payment will run as usual on the 23rd of October.
So, if you change the "next run date" to October 10th:
* The September recurring billing will run on October 10th
* The October recurring billing will run on October 23rd
- If the customer would like to pay the next recurring billing before the next scheduled run date you will need to:
- Set up a one-time payment for the earlier date.
- Follow the "Skip a Payment" instructions to skip the next originally scheduled payment.
Example:
- The recurring billing runs once a month on the 23rd.
- Today is September 9th.
- The customer would like the September billing to process on the 16th.
- You will need to:
* Use "Skip a Payment" to skip the regular billing on September 23rd.
* Create a one-time billing for September 16th.
* The recurring billing cycle will resume on October 23rd.
- Set up a one-time payment for the earlier date.
_______________________________________________________________________________________________________________________________________________________________________________________________
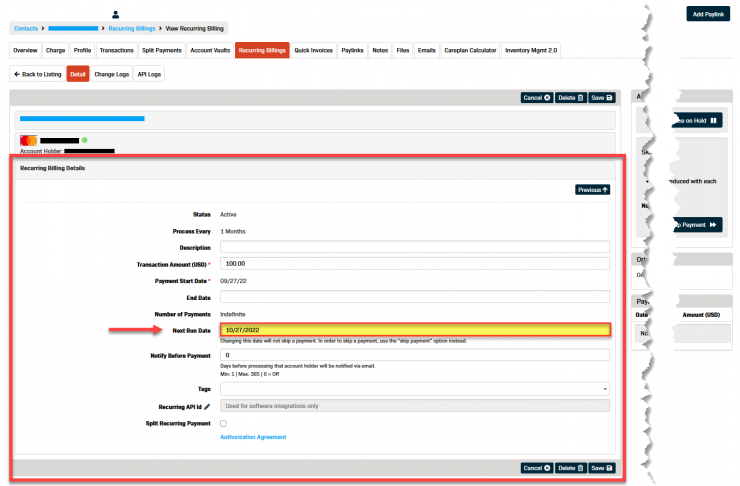
- Click the Actions button (the ellipsis (...)) to the right of the recurring billing you want to edit
- Select Edit from the drop-down menu
- Click in the Next Run Date field on the edit screen
- Use the Calendar to select the "next run date"
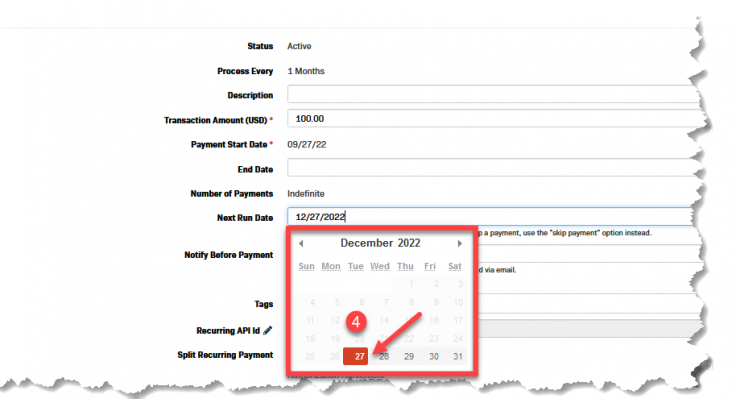
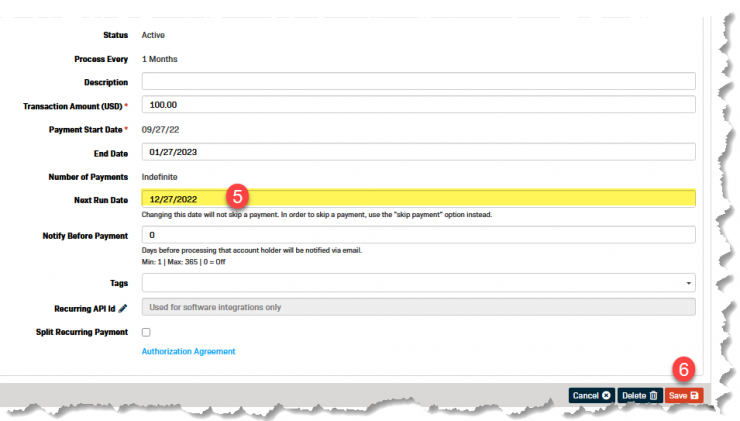
- Verify the Next Run Date you selected is correct
- Click the Save button
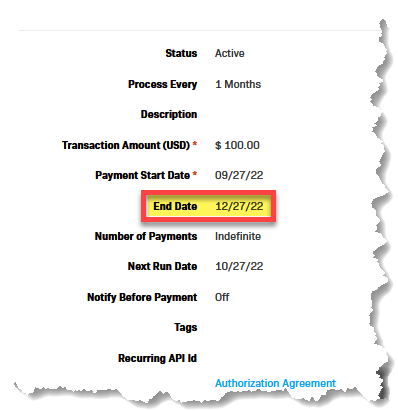
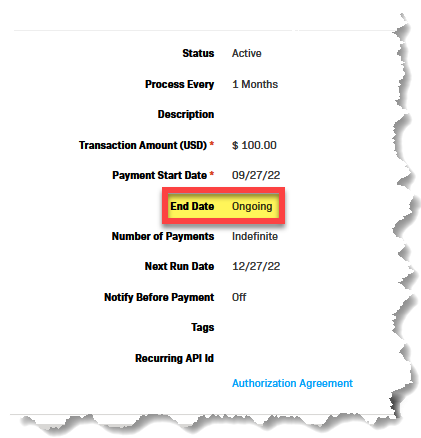
Edit the End Date
The recurring billing "end date" can be used to:
- End an ongoing recurring billing schedule (a recurring schedule with no end)
- Change the end date of a fixed recurring billing schedule
- Change a fixed recurring billing to be ongoing (i.e., clearing the value the End Date field)
If you set a recurring billing to end before the "run date" a payment transaction will not be generated for that cycle.
Example:
- An ongoing recurring billing is scheduled to run once a month on the 23rd.
- You add an "end date" of October 21st.
- The last time this recurring billing will run is September 23rd.
*To have the recurring transaction run in October you will need to set the "end date" for October scheduled date (i.e., the 23rd).
______________________________________________________________________________________________________________________________________________________________________________________________
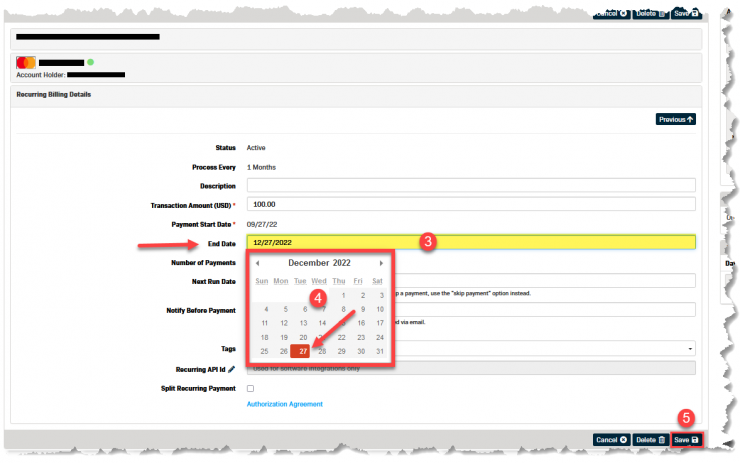
Add an End Date to a Recurring Billing
- Click the Actions button (the ellipsis (...)) to the right of the recurring billing you want to edit
- Select Edit from the drop-down menu
- Click in the End Date field
- Use the Calendar to select the desired "end date"
- Click Save
______________________________________________________________________________________________________________________________________________________________________________________________
Remove the End Date from a Recurring Billing
(Change a Fixed Recurring Billing to Ongoing)
- Click the Actions button (the ellipsis (...)) to the right of the recurring billing you want to edit
- Select Edit from the drop-down menu
- Click in the End Date field
- Clear the date value from the field
- Click Save
______________________________________________________________________________________________________________________________________________________________________________________________
Confirm the End Date of a Recurring Billing
(Confirm if a Recurring Billing Schedule is Ongoing or Fixed)
- Click the Actions button (the ellipsis (...)) to the right of the recurring billing you want to view
- Select View from the drop-down menu
- Check the End Date value
Note: It should either be a date or "Ongoing"