
PayForm & AccountForm Integrations
Where to use PayForm and AccountForm
PayForm and AccountForm are intended to be used in an access-controlled merchant-facing application such as point-of- sale or back-office software.
PayForm is intended to be used as an interface for a merchant to manually process card payments or for launching transactions on a connected point-of-sale terminal. AccountForm is intended to be used as an interface for a merchant to manually store a customer's payment credentials using the Account Vault tokenization service.
Please do not use PayForm or AccountForm in a public-facing application where a customer makes their own payment, because it is not suitable for this purpose. If you are developing an application that takes payments from customers directly, please use the Hosted Payments Page.
Overview
Here you can learn how to create Account Vaults and Transactions using our AccountForm and PayForm widgets, which will keep you out of scope for PCI as the form code is being generated and hosted by us, another key part of staying out of scope for PCI Compliance.
The PayForm widget can be used for running sale, authonly, or refund transactions. Any void, authincrement, or authcomplete transactions are done as PUT transactions using the id returned from the /v2/payform endpoint. PUT transactions do not require account_number and exp_date fields to be submitted, therefore need to be done on the /v2/transactions endpoint.
Whether you are attempting to use Payform or Accountform, the process for generating either form is very similar.
- Prepare a
datavariable as a JSON string. - Hex the
datavariable and use withhash-key,developer-id,user-id, andtimestampto create the URL to retrieve the form. - The URL can be used as an iframe source to embed within another application, or can be accessed directly.
- The URL will return an HTML form with the necessary fields to gather the appropriate information.
Note: The client software from the ISV will be either an installed application or a website loading an iFrame/payment form.
- The URL will return an HTML form with the necessary fields to gather the appropriate information.
- The user will then complete and submit the form back to the server for processing.
- Depending on additional parameters that the developer can supply, the iframe may close the window it appears in automatically or redirect to another URL.
1. Preparing data for the request
Below you will see examples of a data JSON object for both AccountForm and PayForm. These requests are for demonstrative purposes only and there are additional fields that can be provided that are outline below.
{
    "transaction":{
        // Required fields
        "payment_method": "{cc or ach}",
        "action": "sale",
        "transaction_amount": "13.00",
        "transaction_api_id": "111111111111111111111111",
        // Optional fields for the transactions endpoint
        "location_id": "1111111111111111111111111",
        "billing_street": "43155 novi",
        "billing_zip": "12342",
        "tip_amount": "12",
        "surcharge_amount": "0",
        "product_transaction_id": "1111111111111111",
        "order_num": "1234567890",
        "contact_id": "222222222222222",
        // Optional field for controling iframe behavior
        "stylesheet_url": "{full URL - i.e. https://third.party.domain/css/styles.css}",
        "parent_close": true,
        "parent_close_delay": 5,
        "display_close_button": false,
        "redirect_url_on_approval":"https://www.mysite.com",
        "redirect_url_on_decline":"https://www.mysite.com",
        "redirect_url_delay": 5,
        "require_zip": 1,
        "require_street": 1,
        "show_street": 1,
        "show_zip": 1,
        "hide_entry_type":false
    }
}
Overriding the styles for PayForm
WIthin the optional fields described above you will notice there is a stylesheet_url. This field can be used to include your own stylesheet to override the default styles already included on the page. You can use the following link to download the latest default CSS for PayForm as a starting point for your custom stylesheet:
Once you have prepared your custom CSS and made it available on a public URL you can include it in your PayForm request as illustrated below:
{
    "transaction":{
        // Required fields
        "payment_method": "{cc or ach}",
        "action": "sale",
        "transaction_amount": "13.00",
        // Optional field for controling iframe behavior
        "stylesheet_url": "{full URL - i.e. https://third.party.domain/css/styles.css}",
        [...] // Other Optional Fields
    }
}
{
    "accountvault": {
        // Required fields
        "payment_method": "{cc or ach}",
        "location_id": "1111111111111111111111111",
        "account_vault_api_id": "1111111111111111111111111",
        // Optional fields for accountvaults endpoint
        "contact_id": "1111111111111111111111111",
        "title": "Account_vault",
        "account_holder_name": "john smith",
        // Optional Fields used to control iframe behavior
        "show_account_holder_name": true,
        "show_street": true,
        "show_zip": true,
        "stylesheet_url": "{full URL - i.e. https://third.party.domain/css/styles.css}",
        // Optional Fields used to control iframe after completion
        "display_close_button": true,
        "parent_close": true,
        "parent_close_delay": 3,
        "parent_origin": null,
        "redirect_url_on_approval": "https://www.google.com",
        "redirect_url_delay": 10,
        "hide_entry_type":false
    }
}
Overriding the styles for AccountForm
WIthin the optional fields described above you will notice there is a stylesheet_url. This field can be used to include your own stylesheet to override the default styles already included on the page. You can use the following link to download the latest default CSS for AccountForm as a starting point for your custom stylesheet:
Once you have prepared your custom CSS and made it available on a public URL you can include it in your AccountForm request as illustrated below:
{
    "accountvault": {
        // Required fields
        "payment_method": "{cc or ach}",
        "location_id": "1111111111111111111111111",
        "account_vault_api_id": "1111111111111111111111111",
        // Optional Fields used to control iframe behavior
        "stylesheet_url": "{full URL - i.e. https://third.party.domain/css/styles.css}",
        [...] // Other optional fields
    }
}
Optional Fields
Any field from the Account Vaults endpoint can be passed in the JSON above for use in the Account Vault creation. Or you can pass an account_vault_id to use an existing one.
In addition to the fields that can be supplied from the Account Vaults endpoint, the following can be supplied to control the final outcome of the AccountForm:
| Field Name | Type | Max Length | Description |
|---|---|---|---|
| parent_close | boolean | If sent to true, the Account Form will close automatically when the account vault is stored. | |
| parent_close_delay | boolean | If parent_close is set to true, then this is the delay for how long to wait before closing the Account Form. | |
| display_close_button | boolean | By default this field is set to true. If you don’t want to display the “close” button, submit it as false in the data. | |
| entry_method | string | 8 |
The option to send for method of storing card. This field is optional, but if supplied must be one of "manual", "terminal", or "both". |
| show_title | boolean | By default is set to true, can be set to false in data for not displaying “title” in Account Form. | |
| show_account_holder_name | boolean | By default it is true, can be set to false in data for not displaying “Account Holder Name” in Account Storage Form widget. | |
| show_street | boolean | This field is set to true if product transaction has vt_show_street set to true. | |
| show_zip | boolean | This field is set to true if product transaction has vt_show_zip set to true. | |
| stylesheet_url | string | 256 | Set this to a valid URL that contains a stylesheet in order to override the default styles on the Account Form. Should be full url, ie. https://example.com/stylsheet.css |
| redirect_url_on_approval | string | 256 | The page a user will get redirected to upon successful storage of Account Vault. |
| redirect_url_delay | integer | 2 | The time delay in seconds before redirecting to the url in redirect_url_on_approval |
| parent_send_message | boolean | When set to 1, this will allow for the JSON response from the form submission to be posted back to the parent window containing the iframe. For more info see Using postMessage. | |
| contact_id | string | 32 | the contact the account belongs to |
| contact_api_id | string | 64 | This can be supplied in place of contact_id if you would like to use a contact for the account and are using your own custom api_id's to track contacts in the system. |
| hide_entry_type | boolean | Set to true to remove the 2 buttons of choosing what entry mode can be used to input the card information. The entry_method must also be provided in order for this to work | |
| account_vault_id | string | This set the account vault to use and will hide all options in payform and only display the account vault data that will be used to run the transaction. | |
| account_vault_api_id | string |
(AccountForm) this is the account_vault_api_id of the account vault to be created, however if the account_vault_api_id already exists, the form that will be generated will (Payform) This can be supllied instead of account_vault_id if you are using your own custom api_id's in the system. |
2. Build the URL to retrieve the form
In the following code example you will see the steps necessary to generate the URL that can be used for retrieving the desired form.
- Generate the secure hash.
- Convert the data to hex.
- Build the URL to retrieve the form.
<?php
// [1] Generate the secure hash
$user_hash_key = 'my_user_hash_key'; // secret hash key used for hashing the variables
$user_id = 'my_user_id'; // variables for generating the required hash
$timestamp = time(); // variables for generating the required hash
$salt = $user_id . $timestamp; //$user_id and $timestamp need to be in this order
$hash_key = hash_hmac('sha256', $salt, $user_hash_key);
// [2] Convert the data to hex
// In this example, data is for a transaction
$data = implode(unpack("H*", '{"transaction":{...}}'));
// [3] Build the URL to retreive the form
$domain = "https://api.sandbox.domain.com";
$endpoint = "payform"; // could also be "accountform"
$url = sprintf("%s/v2/%s?developer-id=%s&hash-key=%s&user-id=%s×tamp=%s&data=%s",
$domain,
$endpoint,
$developer_id,
$hash_key,
$user_id,
$timestamp,
$data
);
// Function needed to convert string to hex
function asctohex(asc) {
  var hex = '';
  for (var i = 0; i < asc.length; i++) {
    hex += ('0' + asc.charCodeAt(i).toString(16)).slice(-2);
  }
  return hex;
}

// JS Object holding all of the required parameters
var params = {
    "developer-id": "{api_developer_id}",
    "hash-key": "",
    "user-id": "{my_user_id}",
    "timestamp": Math.floor((Math.floor(Date.now()) - (1*60000))/1000),
    "data": {
        "transaction": {
            "payment_method": "cc",
            "action": "sale",
            "transaction_amount": "12.00",
            "location_id": "{location_id}",
            "transaction_api_id": "{transaction_api_id}",
            "show_cvv": "1",
            "tax": "3"
        }
    }
};

// [1] Generate the secure hash
params['hash-key'] = CryptoJS.HmacSHA256(params['user-id'] + params['timestamp'], "{my_user_hash_key}");

// [2] Convert the data to hex
params['data'] = asctohex(JSON.stringify(params['data']));

// [3] Build the URL to retreive the form
var url = "https://api.sandbox.domain.com/v2/payform?";// could also be "accountform"
Object.keys(params).forEach(function (key) {
    url += key + '=' + params[key] + '&';
});
Required Parameters
There are 5 required parameters for making the request. The following table describes those parameters as well as where they can be passed:
| Parameter | Header | URL | Description |
|---|---|---|---|
| user-id | ✔ | ✔ | The user-id |
| timestamp | ✔ | ✔ | The current time when the page has been generated. It has an expiry period of 15 minutes. |
| hash-key | ✔ | ✔ | This is the hash key provided by the API that is used to generate the signature hash. This key is secret and should not be shared with anyone. |
| developer-id | ✔ | ✔ | The developer-id is something that should be hard coded into your software. This is only for you to use and should be embedded in your software so that you shouldn't have to openly provide it to merchants/customers. |
| data | ✔ |
This should be hexed to prevent users from altering the data that is intended to be transmitted. |
HMAC Authentication
The user-id and timestamp which are passed in the request to the API, will generate another HMAC using user’s user_hash_key. This will check against what was submitted in the hash-key parameter. If they don’t match, you will see a validation message as “Hash key is invalid”
There are 3 parameters that are required to generate a signature hash.
- User ID: Provided when a User is setup
- Timestamp: The current time when the page has been generated. it has an expire period of 15 minutes
- User Hash Key: This is the users hash key provided that is used to generate the signature hash. This key is secret and should not be shared with anyone.
The hash is generated using the user id and timestamp, in that specific order. The generated HMAC will be good for 15 minutes. Here is sample code of how to generate the signature:
3. Using the URL to retrieve the form
After following the steps outlined above, you should have a URL that can be used to embed the form into another website or application. That URL should look similar to the following:
https://api.sandbox.domain.com/v2/payform?developer-id=b1111111&hash-key=c7fbcad5d892de8d16d94545216cb29c0951b8ae4eec35af7e7674cd25454c01f&user-id=11e7e1b2531a187a87647ed8×tamp=1513362490&data=7b227472616e73616374696f6e22...
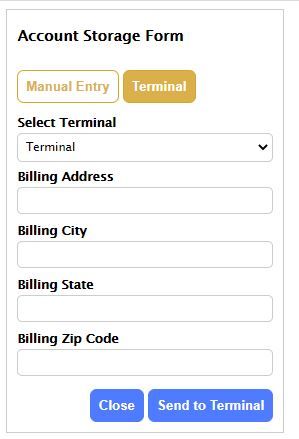
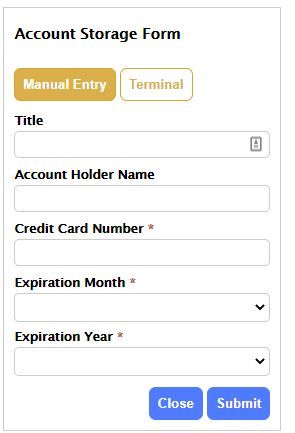
If you embed that iframe or attempt to access the URL directly, you should see something similar to the following images:
Sample Images
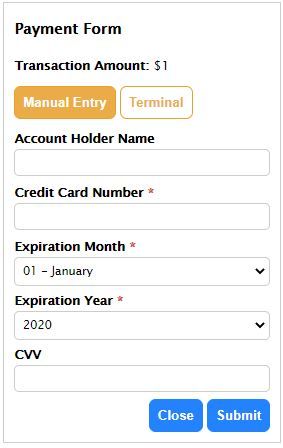
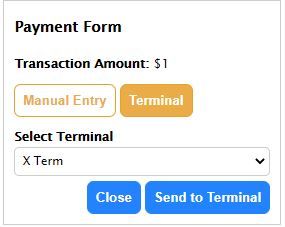
Sample Image
4. User completes and submits the form
When the user submits this form, the form data will then be submitted back to the API for processing.
5. Process is complete
Once the process is complete, the iframe may either automatically close the window it appears in or the user may be redirected to a different URL. It is also possible to have the results from the form submission posted back to the parent window that the iframe was embedded within. For more information about how to capture the response from the iframe submission, take a look at Using PostMessage.