
Oauth Authorization
Oauth Authorization Overview
The oauth authorization method can be used to authorize against the API on any endpoint that needs authorization. Oauth authorization is intended to be used for system to system communication to allow an integrated applications to connect to URLs on a user's behalf.
The following points detail how the oauth authorization operates
- This method must still be used with a developer-id for authentication.
- This implementation of oauth closely adheres to the oauth standard and uses the grant type of "authorization code."
- Once an access-token is granted, it has an expiration, and a new access-token can be obtained by using the refresh-token.
- Oauth authorization granted to an integrated software can be revoked at any time if necessary.
How to Get Started Using Oauth Authorization
Request Acces for you Application
The first step to be able to use oauth authorization with the API is to contact support and request access. Support will need the following information in order to setup your application for use with oauth:
- Application Name - This is the name of the application or integraton that will be accessing the API using oauth.
- Description - A brief description of the application or integration.
- Homepage URL - The main URL of your application or site.
- Redirect URLs - Any redirect urls that will be provided during the setup of each integrated user. Any urls you use must be provided here and added to a whitelist up front or they will not be able to be used during the authorization pocess.
Once your application has been reviewed and entered into the appropriate system, support will provide a client id and client secret back to you that will be used during the authorization process of each user. Some requests require the client_id and client_secret to be included, otherwise the requests may be rejected.
Visual Overview of Oauth Flow
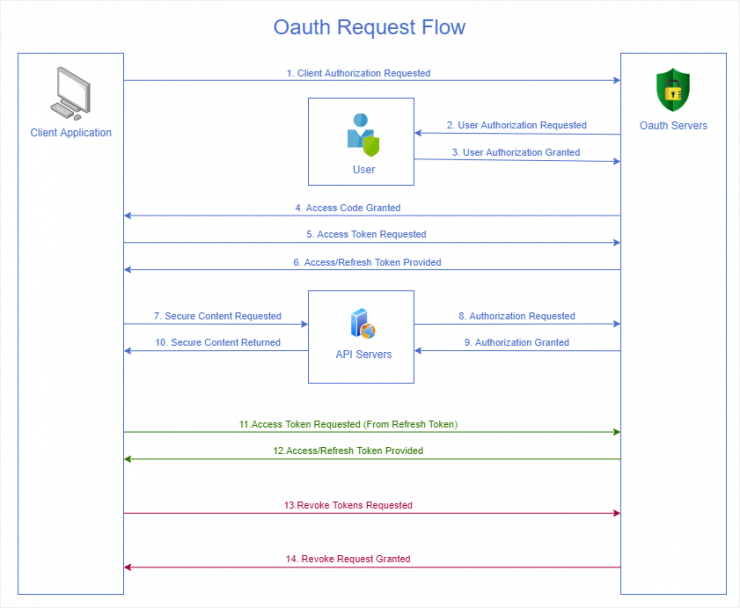
The following diagram provides a visual overview of the flow of communication in the oauth process. Steps 1-6 will need to be performed only one time for each new user that needs to be authorized. After that, steps 7-10 are performed when requesting secure content from the API. If the access-token has expired, a new access-token will need to be requested from the oauth server using the refresh-token as outlined in steps 11-12. If at any time the user wishes to revoke access to the remote system, an access-token and refresh-token can be revoked by the sending a revoke request to the oauth service as outlined in steps 13-14.
Integrate Steps - How To
Based on the Oauth Flow outlined above, the following sections detail how to integrate to each step along the way. There are four main pieces to using the oauth integration. Steps 1-6 happen once for each user. Steps 7-10 happen with each request for secure content. Steps 11-12 heppen when the access token has expired and a new token is needed using the refresh token. Steps 13-14 happen if the user wishes to revoke access.
The follow steps all assume that the application process has been completed and you have been granted your client id and client secret.
Step 1 - Client Authorization Request
The intital step for integration will consist of the user requesting access to oauth for the API. This request should be initiated to the integrated software by the user. By having the user initiate the request, the integrated software can help guide the user through the authorization process to get the access credentials.
When a user initiates a request to the integrated software, the integrated software should open the initial authorization URL to the oauth server for the user. This GET request URL needs to contain all the required parameters for authorization. A sample request will look as follows:
GET https://api.com/o/authorize?response_type=code&redirect_uri={{redirect_uri}}&cient_id={{client_id}}&scope=api&state={{state}}
Here are the definitions and examples of the above variables:
response_type - Currently the only supported response_type is "code"
redirect_uri - This must ba a valid url that the user will be directed to in step 4 upon successfully granting authorization to the ingterated software. This url must be one of the urls provided when the application was submitted.
client_id - This is the client _id that was provided to you once the application for oauth was completed for your integrated software.
scope - If the authorization grant is going to be for the API, then the only supported scope is currently "api". This means that when the user grants authorization to the integrated software, the integrated software will be able to perform all actions that the user normally would in the User Interfce and API.
state - This is a json object containing specific parameters that you will need to complete the oauth setup. For example, you may provide your user's user id or username so that when the request is passed back to your redirect uri from the oauth server, you know which user is trying to complete authorization. The state parameter you provide here will be passed back to you in step 4 just as you provide it in step 1.
Step 2 - User Authorization Requested
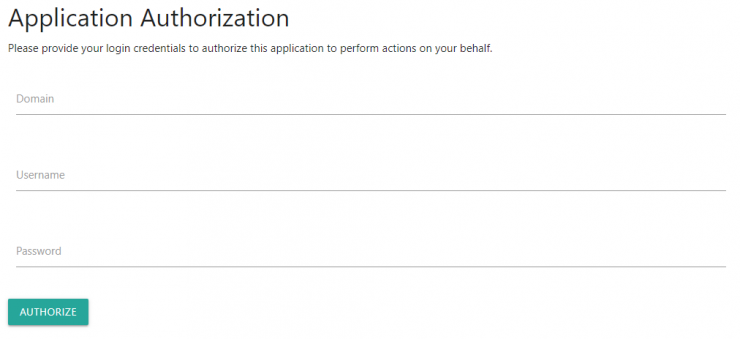
This step is handled completely by the user. During this step, the user will be presented with a login page where they will need to enter their login credentials that they normally use to log into the User Interface for the API. They will need to know their login domain, username and password. Here is an example of the authorization screen that will be presented to the user.
Step 3 - User Authorization Granted
This step is handled completely by the user. The login form is submitted by the user back to the auth server for credential verification. If the credentials are valid and the user grants authorization, they will then be sent a 302 redirect response to direct their browser to the redirect_uri provided in step 1.
Step 4 - Access Code Granted
If authorizatioon is successful, the user is now redirected back to the integrated software to the redirect_uri provided in step 1. It is now up to the integrated software to parse the url to get the appropriate information needed for the next step in the process. A 302 redirct_uri will look similar to the following:
https://{{redirect_uri}}?code={{authorization_code}}&state={{state}}&user_id={{user_id_from_api}}
Here are the definitions and examples of the above variables:
redirect_uri - Ths is the base url provided in the url paramaters in step 1.
authorization_code - This is the authorization code that will be used to complete the integration with the requesting software.
state - This will be the same state value provided in step 1.
user_id - This is the user id in the API for the user that authenticated in step 3.
Step 5 - Access Token Requested
When the user is redirected back to the integrated software in step 4, it passes an authorization_code in the url parameters. This code is then used to turn around and perform another request to the oauth server to get the access-token and refresh-token. These tokens will be used in future requests to request access to the API for secure documents. The request in this step should look similar to the following:
POST https://api.com/o/token?code={{code}}&state={{state}}&client_id={{client_id}}&client_secret={{client_secret}}&grant_type=authorization_code
Here are the definitions and examples of the above variables:
code - This is the code that was returned in the url parameters in the 302 redirect from step 4. This is a required key to connect the user to the previous request. This code will expire after a few of minutes so it needs to be used immediately once the 302 redirect is received by the integrated software server.
state - This is a value provided for your use that will be received back in the response to this request.
client_id - The client_id issued when the application setup was completed.
client_secret - The client_secret issued when the application setup was completed.
grant_type - The only grant type that will work with these parameters is "authorization_code"
Step 6 - Access Token Provided
Once this request is sent, and the code is validated, the oauth server will respond with valid data, including a valid access-token and refresh-token. A sample response will look as follows:
{
"access_token": "XXXXXXXXXXXXXXXX",
"token_type": "bearer",
"expires_in": 172800,
"refresh_token": "YYYYYYYYYYYYYYYY",
"state": "{\"my_client_id\": \"0987654321\"}",
"user_id": "ZZZZZZZZZZZZZZZZ"
}
Here are the definitions and examples of the above variables:
access_token - A valid access-token that is valid for expires_in seconds that can be used to request secure content from the API.
token_type - The type of token being return. The API currently only support bearer type tokens, so that is what this oauth implementation currently returns in this request.
expires_in - Length of time in seconds that the supplied access-token is valid.
refresh_token - A refresh-token that can be used to acquire a new access-token once the current one expires.
state - The same state value provided in the request for the access token.
user_id - The user_id of the user in the API.
The access-token and refresh-token will need to be extracted from the above response. The access-token can be used to request content from secure URLs in the API, as outlined in steps 7-10. When the above response is received, the integrated software should take note of the expires_in value. This is the length of time that this access-token is valid. Once this many seconds has expired, the access-token is no longer valid and a new access-token needs to be acquired using the above refresh-token. This process is outlined in a section further below called "Refresh Token Request."
Step 7 - Secure Content Requested
Now that the integrated software has the necessary tokens, it can request secure content from the API. This can be done by inserting a valid access-token into the header of the request. The access-token is sent in the "Authorization" header as type "Bearer". The following request is an example of how to use the access-token while sending a call to the API to get a list of transactions.
Request Header: "Authorization": "Bearer {{access-token}}"
Here is a full curl request that utilizes the acess token as authorization to get a transaction listing from the API:
curl --request GET 'https://api.com/v2/transactions?' --header 'Authorization: Bearer {{access_token}}' --header 'developer-id: {{developer-id}}'
Step 8 - Authorization Requested
This step is handled internal to the API system and sends requests internal as need to authorize the access-token again the Oauth server.
Step 9 - Authorization Granted
This step is handled internal to the API system and is the response from the Oauth server to the API.
Step 10 - Secure Content Returned
This step would return the normal content requested from the API, provided the access-token is still valid.
Refresh Token Request
When sending a request to the API using an access token, the integrated software should first make sure the access token hasn't expired. If you try using an expired token, you will be returned a 401 error from the API.
When an access token has expired, a request needs to be sent to acquire a new access token. This is done using a refresh token. A sample request to fetch a new access token using the refresh token looks like the following:
POST https://api.com/o/token?refresh_token={{refresh_token}}&state={{state}}&client_id={{client_id}}&client_secret={{client_secret}}&grant_type=refresh_token
Here are the definitions and examples of the above variables:
refresh_token - This is the refresh_token that was returned in the url parameters in the 302 redirect from step 4.
state - This is a value provided for your use that will be received back in the response to this request.
client_id - The client_id issued when the application setup was completed.
client_secret - The client_secret issued when the application setup was completed.
grant_type - The only grant type that will work with these parameters is "refresh_token"
Refresh Token Response
If the request to oauth server is valid and uses a valid refresh_token, and the tokens have not been revoked, the server should respond with a new access-token. Usually the refresh_token remains the same, but it could also change at this point. A sample response to this request may look as follows:
{
"access_token": "XXXXXXXXXXXXXXXX",
"token_type": "bearer",
"expires_in": 172800,
"refresh_token": "YYYYYYYYYYYYYYYY",
"state": "{\"my_client_id\": \"0987654321\"}",
"user_id": "ZZZZZZZZZZZZZZZZ"
}
Revoking Token Request
If a user wishes to disconnect the integration and no longer allow the integrated software to access secure content on their behalf, a revoke request can be sent to the oauth service to revoke the keys that are currently active. Currently, this request is sent from the integrated host like so:
POST https://api.com/o/revoke?token={{refresh_token}}&client_id={{client_id}}&client_secret={{client_secret}}
Here are the definitions and examples of the above variables:
token - This is the refresh_token that was returned in the url parameters in the 302 redirect from step 4.
client_id - The client_id issued when the application setup was completed.
client_secret - The client_secret issued when the application setup was completed.
Revoking Token Response
A response from the revoke request will not return any data. The response will be an http response code of 204 with no content if successful.