
Mobile Products
Mobile SDK
The Fortis Mobile SDK has support for iOS, Android, Cordova, and Windows. iOS, Android, and Cordova support the Bluetooth version of the ID TECH VP3300. Windows supports the USB version of the ID TECH VP3300.
Mobile SDK Process Flow
To use the Mobile SDK, you will first need to ensure that Fortis' support team has sent you your appropriate credentials. Then before beginning, analyze your codebase to determine the best location for handling the transaction flow. For instance, you may want to add a new class to handle both the calls to the SDK and the callbacks from the SDK. Prepare for the following logical steps within the code:
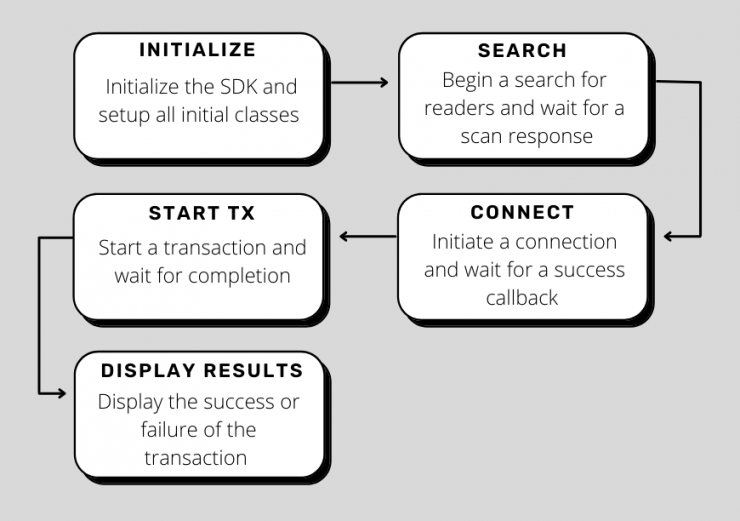
Based on those logical steps, the following details can assist with
-
Initialize: In the initialization routines for the class handling transactions:
-
Create a RestServiceClient and setup whether the SDK should connect to our sandbox server or to our live one.
-
Create a Dictionary/HashMap of parameters for the request headers required for a transaction. These include your developer-id, user-id, and user-api-key.
-
Set the Request Headers for the RestServiceClient using the object you created in step 2.
-
Create a new EMVTransaction object passing in the RestServiceClient
-
-
Search: Call the EMVTransaction's scanForDevices method when you are ready to initiate a search for your reader. Ensure that your reader is powered on and waiting for a connection.
-
Connect: When you receive a deviceScanResponse callback from the SDK, then take action to record the reader's information. Once you are ready to initiate a connection, then call connectDeviceByName or connectDeviceByAddress to connect to the device.
-
Once you've received the deviceConnected callback, then update your UI to reflect the connection.
-
Start Tx: When you're ready to initiate a transaction, create a Dictionary/HashMap of parameters for the transaction, including at minimum: action, payment_method, transaction_type, location_id, and transaction_amount. Call performEMVSale to initiate the Transaction flow.
-
Display Results: The transactionResponse callback will indicate the success or failure of the transaction as well as provide additional details to use
.
Mobile Transaction Request/Response
During the process of running a transaction, the SDK will create an HTTPS request, POST it to the Fortis Gateway, retrieve the response, and then return that to your code.
The request will automatically be assembled and sent to the gateway for you without needing to do anything additional in your code, and will include the card information that was retrieved in the transaction. The request will be similar to the following (which has been anonymized to not include actual identifying information):
{
  "transaction": {
    "kernel_version": "12345678901234567890",
    "payment_method": "cc",
    "device_serial_number": "1234abc",
    "emv_request": "***************************************************************",
    "e_serial_number": "1234567890abcdef12345678",
    "entry_mode_id": "P",
    "transaction_type": "sale",
    "action": "sale",
    "location_id": "1234567890abcdef12345678",
    "transaction_amount": "135.00",
    "e_format": "**********"
  }
}
Your code will receive the response JSON in the transactionResponse callback, which you will need to process the json to determine whether the transaction succeeded or not and to record the transaction ID. Additional information on each of these parameters is included in the Transaction documentation.
The response example below includes a status_id of 101, which indicates success. Your code should accomodate for situations in which other statuses may be returned. See the documentation for more details.
{
  "transaction" : {
    "type_id" : 20,
    "id" : "1234567890abcdef12345678",
    "is_accountvault" : false,
    "customer_ip" : null,
    "terminal_serial_number" : "********",
    "avs_enhanced" : "V",
    "notification_phone" : null,
    "status_id" : 101,
    "reason_code_id" : 1000,
    "is_recurring" : false,
    "hosted_payment_page_id" : null,
    "notification_email_sent" : true,
    "billing_state" : null,
    "currency" : "USD",
    "routing" : null,
    "account_vault_id" : null,
    "custom_data" : null,
    "transaction_settlement_status" : null,
    "description" : null,
    "cvv_response" : "N",
    "billing_phone" : null,
    "terminal_id" : "********************",
    "installment_counter" : null,
    "transaction_batch_id" : "1234567890abcdef12345678",
    "location_id" : "1234567890abcdef12345678",
    "transaction_code" : null,
    "notification_email_address" : null,
    "modified_user_id" : "1234567890abcdef12345678",
    "first_six" : "123456",
    "account_type" : "amex",
    "trx_source_id" : 12,
    "charge_back_date" : null,
    "entry_mode_id" : "P",
    "installment_total" : null,
    "recurring_id" : null,
    "billing_city" : null,
    "customer_id" : null,
    "tip_amount" : "0.00",
    "void_date" : null,
    "last_four" : "9876",
    "terms_agree" : null,
    "created_user_id" : "1234567890abcdef12345678",
    "recurring_flag" : "no",
    "order_num" : "123456789",
    "currency_code" : 840,
    "emv_receipt_data" : {
      "APPLAB" : "AMERICAN EXPRESS1",
      "CVM" : "Signature Verified",
      "ARC" : "00",
      "MODE" : "Issuer",
      "AID" : "a000000025010801",
      "TVR" : "0000008000",
      "TSI" : "c800",
      "PAN" : "***************",
      "AC" : "1234567890abcdef",
      "IAD" : "234567890abcd",
      "CURR" : "USD$"
    },
    "settle_date" : null,
    "quick_invoice_id" : null,
    "contact_id" : null,
    "product_transaction_id" : "1234567890abcdef12345678",
    "auth_amount" : "135.00",
    "created_ts" : 1663353802,
    "transaction_amount" : "135.00",
    "payment_method" : "cc",
    "clerk_number" : null,
    "billing_street" : null,
    "modified_ts" : 1663353802,
    "secondary_amount" : "0.00",
    "billing_zip" : null,
    "cavv_result" : null,
    "return_date" : null,
    "_links" : {
      "self" : {
        "href" : "https:\/\/api.sandbox.zeamster.com\/v2\/transactions\/1234567890abcdef12345678"
      }
    },
    "account_holder_name" : null,
    "ach_sec_code" : null,
    "transaction_api_id" : null,
    "avs" : null,
    "tax" : "0.00",
    "verbiage" : "Test 1234",
    "additional_amounts" : [

    ],
    "po_number" : null,
    "par" : "1234567890abcdef1234567890abc",
    "stan" : null,
    "auth_code" : "123abc45",
    "transaction_c1" : null,
    "ach_identifier" : null,
    "transaction_c2" : null,
    "effective_date" : null,
    "response_message" : null,
    "check_number" : null,
    "transaction_c3" : null,
    "batch" : "2"
  }
}
iOS SDK
Download: IOS Mobile SDK Plugin Version 1.5 (latest)
Sample App: iOS Mobile SDK Sample App 1.4.2
Introduction
This documentation is to give a detailed overview on how to use the iOS Payment SDK for native iOS development. The instructions below assume you are using Xcode for your development.
The SDK download for each platform also includes a sample app that can be used for reference in planning your own implementation. Inside the sample app are two "TODO" comments which you can replace the authentication values with the ones provided by the Fortis API team for your access, which will make it quicker to get up to speed with using the app with your test account.
You have two choices for integrating the SDK:
- Manual Integration: Begin at step 1 one in the list below.
- CocoaPod Integration: Include the following line in your Podfile, and then jump to step 2d below:
pod 'FortisPaymentSDK'
Using the iOS Payment SDK:
1. Download the latest IOS payment SDK
2. Import the xcframework into your project. Note that the SDK is now an xcframework, so this step has been modified to handle that switch.
a. Select your project in the left panel, go to the Build Phases tab, and expand Embed Frameworks
b. Add the PaymentSDK.xcframework from the zip file you downloaded. Ensure that you've expanded the zip file and copied the PaymentSDK.xcframework folder to the location you want to keep the library in.
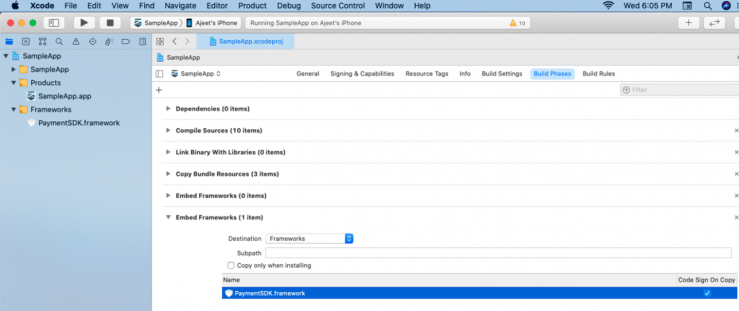
c. Under Build Phases expand Copy Bundle Resources. Add the IDTECH.bundle (it is inside the PaymentSDK.xcframework folder)

d. Go to the Info tab, and set usage descriptions for the following items:
- Privacy - Bluetooth Peripheral Usage Description
- Privacy - Bluetooth Always Usage Description
3. Build the project and ensure there are no errors.
4. Create an object of type RestServiceClient:
let restServiceClient = RestServiceClient(apiProtocol:apiProtocol, apiHostName:apiHostName, apiEndpointPath:apiEndpointPath)
apiProtocol = http/https – the protocol being used by api server for processing he transactions
apiHostname = api.abc.com - hostname of the API server
apiEndpointPath = /v2/transactions - full endpoint of an API
5. Create a dictionary with the developer credentials provided by Fortis for API access, and then call setRequestHeader with this dictionary. If additional headers are required, add them to this dictionary as well.
-
var transactionHeaderDict : [String : String]!  = [:]

transactionHeaderDict["param1"]="Value1";

transactionHeaderDict["param2"]="Value2";

transactionHeaderDict["param3"]="Value3";
Note: If you need to include additional query string parameters in the request, then create a dictionary for those, and set those accordingly.
var transactionQueryParamDict : [String : String]!  = [:]

transactionQueryParamDict["param1"]="Value1";

transactionQueryParamDict["param2"]="Value2";

transactionQueryParamDict["param3"]="Value3";
6. Create another dictionary with all fields required for the POST to the API. These will be included in the POST body.
-
var transactionParamDict : [String : String]!  = [:]

transactionParamDict["param1"]="Value1";

transactionParamDict["param2"]="Value2";

transactionParamDict["param3"]="Value3";
7. Determine which type of transactions you want to support. The SDK supports both Non EMV Transactions (card not present) and EMV transactions, which includes swipe, tap, or card inserts.
- Non EMV transactions
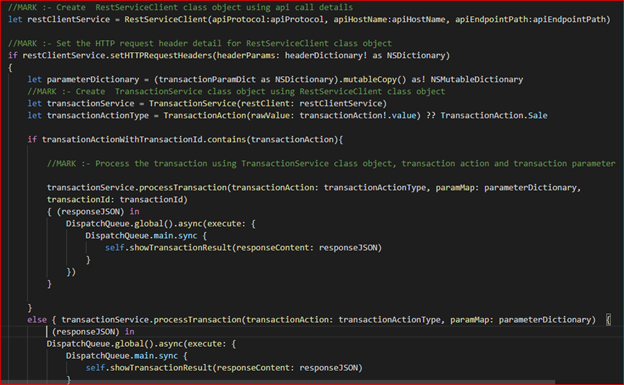
- Set the http request header details for the restServiceClient object.
restServiceClient.setHTTPRequestHeaders(headerParams: headerDictionary! as NSDictionary)
- Create an instance of the TransactionService class by passing the restServiceClient object created earlier. Then, call the processTransaction method and pass the arguments as shown below.
let transactionService = TransactionService(restClient: restServiceClient)

transactionService.processTransaction(transactionAction: transactionActionType, paramMap: parameterDictionary, transactionId: transactionId)

                { (responseJSON) in

                    DispatchQueue.global().async(execute: {

                        DispatchQueue.main.sync {

                            self.showTransactionResult(responseContent: responseJSON)

                        }

                    })

                }
transactionAction = one of the actions of TransactionAction Enum class as per requirement.
paramMap = input parameters required by Transaction API for a type of action to be performed.
transactionId = required, when the action is to be performed on an existing transaction.- Sample Code:
- Sample Code:
- Once the transaction completes with success or failure, the response will be returned in the processTransaction() function completion block.
- Set the http request header details for the restServiceClient object.
- EMV transactions
- Create a RestClientService object with appropriate parameters and set the request header details.
- Create an instance of the EMVTransaction class by passing the restServiceClient object created earlier:
let restServiceClient= RestServiceClient(apiProtocol:apiProtocol as! String, apiHostName:apiHostName as! String, apiEndpointPath:  apiEndpointPath as! String)

        if(restClientService.setHTTPRequestHeaders(headerParams: transactionHeaderDict as NSDictionary)) {

            emvTransaction = EMVTransaction(restClient: restServiceClient)

            emvTransaction.delegate = self

            emvTransaction.setDeviceType(type: DeviceType.IDTECH_VP3300BT)

        }
After creating the emvTransaction object, set its delegate to self and then set the device type. - To perform an EMV transaction, implement the EMVUIDelegate methods on the class we are processing the EMV transaction in:
func deviceMessage(message: String!) { DispatchQueue.main.async { //Add code to show device LCD message } } func deviceScanResponse(deviceID: String!, deviceName: String!) { // Add code to hold the device scan response // If you'd like to immediately connect, then you may do so here: emvTransaction.connectDeviceByName(name: deviceName) } func deviceConnected() { DispatchQueue.main.async { //Add code to show the device is connected. } } func deviceDisconnected() { DispatchQueue.main.async { //Add code to show device is disconnected. } } func outputLogs(logs: String!) { DispatchQueue.main.async { // Add code to show transaction output logs } } func transactionResponse(data: String!) { DispatchQueue.main.async { //Add code to show the transaction response. } } - Next call scanForDevices() method to start a device scan:
emvTransaction.scanForDevices()
- Device scan responses are returned to the deviceScanResponse() method you implemented. This method receives device name and ID, which you can use in other methods to connect to a specific device. This method will be called multiple times for each device found, but will only be called once for each unique reader.
- Once your card reader is found, use the connectDeviceByName() method of the emvTransaction instance to connect the device. You can also use a separate method to connect using the device's ID instead if you do not want to connect via name.
- Once the reader is connected successfully a response is sent to the deviceConnected() method you implemented.
- If the reader gets disconnected, the deviceDisconnected() method will be called.
- When you are successfully connected to the reader, use the credit/debit card and card reader device to gather card track data and call any of the following methods. Any of these can be used to call on emvTransaction with the required parameters action and payload as inputs.
- PerformEMVSale()
emvTransaction.PerformEMVSale(jsonPayload: transactionParamDict)
- CancelEMVSale()
emvTransaction.CancelEMVSale();
- Note: The current SDK support two EMV transaction type : SALE and REFUND; In order to perform both transactions, we need to call the same PerformEMVSale() function with payload which should have the action field which is to be performed like ‘sale’ or ‘refund’. Payload inputs will be similar to non-EMV transactions. Details on what parameters should be sent can be found in the Zeamster Transaction API documentation (https://docs.zeamster.com/developers/api/endpoints/transactions)
- PerformEMVSale()
- The current status of a transaction will be reported to the deviceMessage() method you implemented.
- All logs from processing the transaction will be reported to the outputLogs() method you implemented.
- If you want to disconnect the currently connected reader, then call the following method:
emvTransaction.DisconnectDevice();
- Once you receive a response from the transaction processing, parse the passed in json string to determine the status of the transaction. Refer to the Zeamster documentation linked above for additional information.
Setting Device Timeouts
Both the Idle and Sleep timeouts for the device can be updated based on your preference as to how you would like the reader to function. You can also disable the timeouts altogether. Each of the timeout fields can be set according to the number of seconds or minutes you would like the timeout to be depending on which overloaded setTimeout method that you call. You can either specify both timeouts in seconds or minutes, but cannot mix the two (i.e. you cannot specify 15 seconds for idle and 2 minutes for sleep, but you can specify 15 seconds for idle and 120 seconds for sleep). Acceptable values for seconds are allowed between 0 and 255 (0 disables, and all other values specify the number of seconds). Acceptable values for minutes are limited to a specific set which is: 0 (disable timeout), 1, 5, 10, 15, 20, 25, 30, and 90. (all values other than 0 are in minutes)
This method only needs to be called when you want to change the timeout settings. Once you set them, they immediately take effect on the device, and you won't need to call this function again unless you want to change them from what you have set the timeouts to.
To set the timeout values, call the following:
emvTransaction.setTimeouts(idleTime, sleepTime);
For the D135, when using the setTimeouts method in seconds, idleTime must be set with valid values from 1 to 120 and sleepTime set between 60 to 5940. When using setTimeouts in minutes, idleTime can be set with values 1 or 2 and sleepTime can with valid values from 1 to 99. To one or disable both timeouts, set 0 for each parameter.
Get Battery Percentage
The reader's battery percentage can be read by calling the getBatteryPercentage on the EMVTransaction class. With the VP3300 this will return an integer from 0 to 100 indicating the currently detected battery level.
With the D135 this will return an integer between 0 and 5 with the next equivalents:
“5” – external power supply, and battery is charging.
“4” – power 80% ~ 100%
“3” – power 60% ~ 80%
“2” – power 40% ~ 60%
“1” – power 20% ~ 40%
“0” – power 0% ~ 20%
To retrieve the battery level call:
emvTransaction.getBatteryPercentage();
Using the Mock Terminal
The SDK now includes support for Mock Terminals. This allows a developer to run a transaction without needing a physical card reader and to receive appropriate feedback from the gateway as far as success or failure. The Mock Terminal can be forced to return a specific result based on the dollar amount being charged. More information is included on the Test Data page.
To use the Mock Terminal, follow the same flow for searching for, connecting to, and running a transaction on a physical reader, but set the reader type as follows when instanciating your EMVTransaction variable:
emvTransaction = EMVTransaction(restClient: restClientService, device: DeviceTypeOBJC.MOCK_TERMINAL);
Enable Auth Deferred Transactions
As of version 1.1.0, the SDK supports Auth Deferred Transactions. In the event that your internet connection is down, you can choose to store any transactions and have them forwarded to the Fortis gateway at a later time. This functionality is disabled by default, and needs to be enabled each time you instantiate an EMVTransaction object if you desire for it to be in operation.
To enable Auth-Deferred processing, pass the following in the transaction payload:
"enable_auth_deferred": "true",
A full example of this is:
transactionParamDict = ["action": "sale",
                        "enable_auth_deferred": "true",
                        "payment_method": "cc",
                        "transaction_type": "sale",
                        "location_id": "11ec1234abcd1234abcd1234",
                        "transaction_amount": "9.55"
]

emvTransaction.PerformEMVSale(jsonPayload: transactionParamDict)
The transaction will then proceed as follows:
- The card reader will wait for card interaction, and once a swipe/tap/insert occurs, will process the card.
- If an internet connection is detected, then the transaction will be immediately posted to the Fortis gateway as normal.
- If no internet connection is detected, then the transaction will be securely stored on your phone or tablet. Any number of transactions can be stored, and all are encrypted and stored in a manner that the Payment SDK is required to access those. When a transaction is stored, a deviceMessage callback will occur with the message: "No internet connection. Transaction stored for Auth Deferred processing."
At a later time, a subset of information about each stored transaction can be listed in order to determine which transactions you would like to process (including the ID, Date/Time, action, cardholder name, amount, entry mode, and type). Make the following call to retrieve the transactions:
var authDeferred = emvTransaction.fetchAuthDeferredList()
To send a specific transaction to the Fortis gateway, simply pass its ID to the following method. The transaction will be sent to the gateway, and all normal completion callbacks will ensue, including returning the transaction reponse to your code.
emvTransaction.retryAuthDeferred(id: authDefID)
Disable or Enable the ID Tech VP3300 Beep Sound
Starting with version 1.2.0, the SDK now allows control of the beep sound for the VP3300. This is done via the json payload similar to the Auth Deferred functionality.
To disable the beep, pass the following in the transaction payload:
"enable_beep_sound": "false",
To enable the beep, pass the following in the transaction payload:
"enable_beep_sound": "true",
A full example of this is:
transactionParamDict = ["action": "sale",
                        "enable_beep_sound": "false",
                        "payment_method": "cc",
                        "transaction_type": "sale",
                        "location_id": "11ec1234abcd1234abcd1234",
                        "transaction_amount": "9.55"
]

emvTransaction.PerformEMVSale(jsonPayload: transactionParamDict)
The D135 does not support this feature.
Scan a Mag Stripe Card
Starting with version 1.3.0, the SDK includes the ability to scan mag stripe cards and return the track data. Note that this functionality has included protection for only allowing non-payment type mag stripe cards to be read.
To begin a gift card scan, call the following method:
emvTransaction.PerformMSRCardRead();
To cancel the read operation call:
emvTransaction.CancelMSRCardRead();
Once a card is scanned, the data will be returned to the onSuccess callback in our standard transaction JSON format. In this case, a status_id of 101 will be returned (indicating success) and the track_data field will have the scanned data from the card.
The Payment SDK can be installed as a CocoaPod which simplifies a number of the steps above.1. Initialize CocoaPods for your project by following the documentation at: https://guides.cocoapods.org/using/using-cocoapods
1. Open the Podfile in the Pods project in your workspace.
2. Add the following line inside the target’s block that you’re wanting to include the SDK in.
pod 'FortisPaymentSDK'
3. Clean your project and then build it.
4. In the class you would like to use the SDK in, add the following line at the top:
For Swift:
import PaymentSDK
For Objective-C:
#import <PaymentSDK/PaymentSDK.h>
5. Then, follow the main instructions above starting with Step 4.
Android SDK
Download: Current Release is version 1.4.3.
Note that he Android SDK is now distributed fully through Maven, which handles ensuring all dependencies are included as necessary. See instructions below for including the SDK in your project. Legacy versions of the SDK are listed further down this page.
Sample App: Android Mobile SDK Sample App 1.4.6
Introduction
This documentation is to give a detailed overview on how to use the Android Payment SDK for a native Android application. These instructions assume you are using Android Studio (either on Mac or Windows).
The SDK download for each platform also includes a sample app that can be used for reference in planning your own implementation. Inside the sample app are two "TODO" comments which you can replace the authentication values with the ones provided by the Fortis API team for your access, which will make it quicker to get up to speed with using the app with your test account.
Using the Android Payment SDK:
1. Add the following repository to your build.gradle file under the android tag.
repositories {
    maven {
        url = "https://artifact.fortis.tech/repository/maven-public/"
    }
}
2. Under your dependencies tag add the following, including the version of the SDK that you desire to integrate with in place of X.X.X:
implementation 'com.zeamster.paymentsdk:payment-sdk:X.X.X'
3. Run “Sync Project with Gradle files” from Android Studio file menu option.
4. Rebuild the project.
5. Create an object of type RestServiceClient with required input parameters.
RestServiceClient restServiceClient = new RestServiceClient(<protocol>, <hostname>, <apiEndpoint>, this);
Protocol = http/https – the protocol being used by api server for processing the transactions
Hostname = api.abc.com - hostname of the API server
APIEndpoint = /v2/transactions - full endpoint of an API
The last parameter passed, “this”, is the instance of the class where the callback will be received. If the callback is required somewhere else instead of the class where the RestServiceClient object is being created then pass the instance of that class as fourth parameter.
6. Add the callback methods:
a. Now implement the ICallback interface for the class where you will be expecting the callback after transaction API response is returned. This class will be the same class of which we are passing the instance in the RestServiceClient object creation as fourth parameter. In this case, you need to add “implements ICallback” to the class definition and implement two override functions:
@Override
public void onSuccess(String response) {
    //Add code to show success response of transaction
}

@Override
public void onFailure(String response) {
    //Add code to show failure response of transaction
}
b. If you are using a card reader, implement the ICallbackEMV interface on the class where status messages and log responses are expected by implementing the following callback methods. Ensure that you include the following import statement as well:
import com.zeamster.paymentsdk.transaction.ICallbackEMV;

@Override
public void deviceScanResponse(String deviceId, String deviceName) {
   //Add code to hold all the scanned devices.
}

@Override
public void deviceScanCompleted() {
   //Add code to hold result once scan complete.
}

@Override
public void deviceConnected(String status) {
   //Add code to show the device is connected.
}

@Override
public void deviceDisconnected(String status) {
   //Add code to show the current connect device got disconnected
 }

@Override
public void deviceMessage(final String message) {
   //Add code to show the device message on app screen.
}

@Override
public void outputLogs(final String log) {
    //Add code to show transaction output logs
}
Note: You do not have to use the same class for implementing the ICallback and ICallbackEMV interfaces.
7. Create a map to the developer credentials provided by Zeamster, and call setRequestHeader with that map. Any additional headers necessary can be included in this map as well (like adding content type to the header request)
HashMap<String, String> requestHeader = new HashMap<>();
requestHeader.put("developer-id", "value1");
requestHeader.put("user-id", "value2");
requestHeader.put("user-api-key", "value3");
restServiceClient.setRequestHeader(requestHeader);
Note: If you need to provide additional query string parameters, create a separate HashMap and include those as follows:
HashMap<String, String> queryParamaters = new HashMap<>();
queryParamaters.put("param1", "value1");
queryParamaters.put("param2", "value2");
queryParamaters.put("param3", "value3");
restServiceClient.setQueryParams(queryParamaters);
8. Create another map with all fields required to be sent to the transaction API for processing.
HashMap<String, String> payload = new HashMap<>();
payload.put("param1", "value1");
payload.put("param2", "value2");
payload.put("param3", "value3");
9. There are two types of transactions that can be performed:
a. Non EMV transactions –
1- Create an instance of the TransactionService class, passing the restServiceClient object to its constructor. Next, call the processTransaction method:
TransactionService transactionService = new TransactionService(restServiceClient);
transactionService.processTransaction(transactionAction, payload, transactionId);
transactionAction = one of the actions of TransactionAction Enum class
payload = input parameters required by Transaction API for a type of action to be performed.
transactionId = required, when the action is to be performed on an existing transaction.
2- Next, process the response, which will be returned to the onSuccess() or onFailure() functions you implemented for interface ICallback.
b. EMV transactions –
1- Create an instance of the EMVTransaction class passing the restServiceClient object as an argument to its constructor along with the other required arguments. Note that currently the SDK only supports the DEVICE_VP3300_BT and the D135 devices.
EMVTransaction emvTransaction = new EMVTransaction(restServiceClient, this, DeviceType.DEVICE_VP3300_BT);
“this” is the instance of the class where the callback response from the reader is expected.
The third argument should be the current activity.
The fourth argument is the Device Type of the card reader. The defined device types can be found in the ReaderInfo
.DEVICE_TYPE enum class.
2- Implement the ICallbackEMV interface for the class we passed as the second argument while creating the instance of the EMVTransaction class.
3- Call the scanForDevices() method to discover the reader. It has 3 overloads: choose the one that fits your situation:
emvTransaction.scanForDevices();   (default search time of 10 seconds)

emvTransaction.scanForDevices(timeout_in_miliseconds);

emvTransaction.scanForDevices(device_name_or_matching_substring, timeout_in_miliseconds);
4- The response is returned to the deviceScanResponse() method that you implemented earlier in this process.
This method receives two results: device name and device address.
Note: to stop the device scan if you need to interrupt it, call the following method:
emvTransaction.stopScanForDevices();
5- Once you have identified your reader from the results, call either connectDeviceByName() or connectDeviceByAddress() to connect the card reader.
emvTransaction.connectDeviceByName(deviceName);

emvTransaction.connectDeviceByAddress(deviceAddress);
Note: the Android Payment SDK library also has an additional response listener method named deviceScanCompleted(), which can also be used to handle the scan results.
6- Once a successful connection has been made to your reader, the deviceConnected() callback method will be called.
7- If your reader gets disconnected, then the deviceDisconnected() callback method will be called.
8- After making a successful connection, you can use the following two methods on the emvTransaction object to start an EMV transaction or cancel it.
// Finalize the sale
emvTransaction.performEMVSale(transactionAction, payload);

// Cancel the Sale
emvTransaction.cancelEMVSale();
Note: The current SDK supports only two EMV transaction types: SALE and REFUND.
Action and Payload inputs for each transaction type will be similar to the ones for non-EMV transactions. For the details on which parameters to send, check the Zeamster Transaction API documentation at:
https://docs.zeamster.com/developers/api/endpoints/transactions
9- You will be notified of the current status of the transaction in the deviceMessage() callback method.
10- All processing logs from the transaction are passed to the outputLogs() callback method.
11- If at any time you would like to disconnect from the EMV reader, call the following method:
emvTransaction.disconnectDevice();
12- After you receive the response from the transaction processing, take the appropriate action after parsing the returned json string.
Setting Device Timeouts
Both the Idle and Sleep timeouts for the device can be updated based on your preference as to how you would like the reader to function. You can also disable the timeouts altogether. Each of the timeout fields can be set according to the number of minutes you would like the timeout to be. Acceptable values are limited and are: 0 (disable timeout), 1, 5, 10, 15, 20, 25, and 30. (all values other than 0 are in minutes)
This method only needs to be called when you want to change the timeout settings. Once you set them, they immediately take effect on the device, and you won't need to call this function again unless you want to change them from what you have set the timeouts to.
To set the timeout values, call the following:
emvTransaction.setTimeouts(idleTime, sleepTime);
Using the Mock Terminal
The SDK now includes support for Mock Terminals. This allows a developer to run a transaction without needing a physical card reader and to receive appropriate feedback from the gateway as far as success or failure. The Mock Terminal can be forced to return a specific result based on the dollar amount being charged. More information is included on the Test Data page.
To use the Mock Terminal, follow the same flow for searching for, connecting to, and running a transaction on a physical reader, but set the reader type as follows when instanciating your EMVTransaction variable:
emvTransaction = new EMVTransaction(restServiceClient, act, act, DeviceType.MOCK_TERMINAL);
Enable Auth Deferred Transactions
As of version 1.1.0, the SDK supports Auth Deferred Transactions. In the event that your internet connection is down, you can choose to store any transactions and have them forwarded to the Fortis gateway at a later time. This functionality is disabled by default, and needs to be enabled each time you instantiate an EMVTransaction object if you desire for it to be in operation.
To enable Auth-Deferred processing, pass the following in the transaction payload:
payload.put("enable_auth_deferred", true);
A full example of this is:
payload.put("location_id", "11ec1234abcd1234abcd1234");
payload.put("action", "sale");
payload.put("payment_method", "cc");
payload.put("transaction_type", "sale");
payload.put("transaction_amount", "1575.00");
payload.put("enable_auth_deferred", true);

emvTransaction.performEMVSale(TransactionAction.SALE, payload);
The transaction will then proceed as follows:
- The card reader will wait for card interaction, and once a swipe/tap/insert occurs, will process the card.
- If an internet connection is detected, then the transaction will be immediately posted to the Fortis gateway as normal.
- If no internet connection is detected, then the transaction will be securely stored on your phone or tablet. Any number of transactions can be stored, and all are encrypted and stored in a manner that the Payment SDK is required to access those. When a transaction is stored, a deviceMessage callback will occur with the message: "No internet connection. Transaction stored for Auth Deferred processing."
At a later time, a subset of information about each stored transaction can be listed in order to determine which transactions you would like to process (including the ID, Date/Time, action, cardholder name, amount, entry mode, and type). Make the following call to retrieve the transactions:
List<AuthDeferred> tx = emvTransaction.fetchAuthDeferredList();
To send a specific transaction to the Fortis gateway, simply pass its ID to the following method. The transaction will be sent to the gateway, and all normal completion callbacks will ensue, including returning the transaction reponse to your code.
emvTransaction.retryAuthDeferred(txID);
Disable or Enable the ID Tech VP3300 Beep Sound
Starting with version 1.2.0, the SDK now allows control of the beep sound for the VP3300. This is done via the json payload similar to the Auth Deferred functionality.
To disable the beep, pass the following in the transaction payload:
payload.put("enable_beep_sound", false);
To enable the beep, pass the following in the transaction payload:
payload.put("enable_beep_sound", true);
A full example of this is:
payload.put("location_id", "11ec1234abcd1234abcd1234");
payload.put("action", "sale");
payload.put("payment_method", "cc");
payload.put("transaction_type", "sale");
payload.put("transaction_amount", "1575.00");
payload.put("enable_beep_sound", false);
emvTransaction.performEMVSale(TransactionAction.SALE, payload);
Scan a Mag Stripe Card
Starting with version 1.3.0, the SDK includes the ability to scan mag stripe cards and return the track data. Note that this functionality has included protection for only allowing non-payment type mag stripe cards to be read.
To begin a gift card scan, call the following method:
emvTransaction.performMSRCardRead();
To cancel the read operation call:
emvTransaction.cancelMSRCardRead();
Once a card is scanned, the data will be returned to the transactionResponse callback in our standard transaction JSON format. In this case, a status_id of 101 will be returned (indicating success) and the track_data field will have the scanned data from the card.
React Native SDK
Download: Current Release is version 1.4.13.
Note that the React Native SDK is distributed fully through Maven, which handles ensuring all dependencies are included as necessary. See instructions below for including the SDK in your project.
Sample App: download here
Installation and Configuration
1. To install the SDK, use the following command:
install fortis-payment-sdk --registry=https://artifact.fortis.tech/repository/npm-group/
2. Setup Platform-Specific Event Emitter
To listen for SDK responses before calling any functions it requires to have listeners:
- iOS: Use NativeEventEmitter
- Android: Use DeviceEventEmitter
import { DeviceEventEmitter, NativeEventEmitter, Platform } from 'react-native';
import PaymentSDKPlugin from 'fortis-payment-sdk';

const emitter = Platform.OS === 'ios'
  ? new NativeEventEmitter(PaymentSDKPlugin)
  : DeviceEventEmitter;

emitter.addListener('actionName', (event) => {
  console.log(event);
});
Supported Actions
The SDK allows you to perform various payment-related actions by dynamically setting the action name and input parameters.
Scan for devices
This action scans Bluetooth devices.
Note: This requires location permissions on Android, specifically ACCESS_COARSE_LOCATION and ACCESS_FINE_LOCATION.
const action = 'scanForDevices';
const input = JSON.stringify([
  {
    "header": {
      // See Authentication Header section
    }
  },
  "device name", // Optional: Search string
  "100" // Optional: Timeout
]);

PaymentSDKPlugin.execute(action, input);
Output:
Example of a device found(event.message):
deviceScanResponse!@#$00:1C:97:1D:C5:14!@#$IDTECH-VP3300-44547
Note: The device name should be extracted from this message by taking the substring after the last occurrence of the !@#$ character.
connectDeviceByName
Connects to a specific VP3300 device:
// deviceNameScanned = "IDTECH-VP3300-44547"
const input = JSON.stringify([deviceNameScanned])
const event = "connectDeviceByName"

PaymentSDKPlugin.execute(action, input);
Output:
A new event should be emitted to indicate whether the connection was successfully established or not.
disconnectDevice
Disconnects from the card reader.
const input = '[]'
const event = "disconnectDevice"

PaymentSDKPlugin.execute(action, input);
performEMVTransaction
Begin a transaction.
[
{
    "header": {
        // see Authentication Header
    },
    "body": {
        "action": "action name", // sale, refund, void, authonly, avsonly, credit, crebit, etc
        "transaction_amount": 100.0,
        "payment_method": "", // ACH or CC
    }
}
]
cancelEMVTransaction
Cancel an in progress transaction.
const input = '[]'const event = "cancelEMVTransaction"PaymentSDKPlugin.execute(action, input);
stopScanForDevices
Stop searching for devices to connect to.
const input = '[]'
const event = "stopScanForDevices"

PaymentSDKPlugin.execute(action, input);
Authentication Header
The header object contains all the necessary authentication and API details. Below is an example:
{
  "header": {
    "protocol": "https",
    "hostname": "api.sandbox.zeamster.com",
    "apiEndpoint": "/v2/transactions",
    "developerId": "**********",
    "userId": "**********************",
    "userAPIKey": "*******************",
    "userHashKey": "*********************",
    "username": "*********************",
    "password": "***************",
    "domain": "******************",
    "authType": "apikey"
  }
}
SDK Versions
iOS:
Version 1.5 (Full Build) - Note that Swift 6.0.2, 6.0.3, 6.1, 6.1.2, and 6.2 versions are included in this zip.
Version 1.4.11 (Full Build) - Note that Swift 5.9.2, 5.10, 6.0, 6.0.2 and 6.0.3 versions are included in this zip.
Version 1.4.9 (Full Build) - Note that Swift 5.8.1, 5.9, 5.9.2, 5.10 and 6.0 versions are included in this zip.
Version 1.4.8 (Full Build) - Note that Swift 5.8, 5.8.1, 5.9, 5.9.2, and 5.10 versions are included in this zip.
Version 1.4.5 (Full Build) - Note that Swift 5.8, 5.8.1, 5.9, 5.9.2, and 5.10 versions are included in this zip.
Version 1.4.4 (Full Build) - Note that Swift 5.8, 5.8.1, 5.9, 5.9.2, and 5.10 versions are included in this zip.
Version 1.4.3 (Full Build) - Note that Swift 5.8, 5.8.1, 5.9, 5.9.2, and 5.10 versions are included in this zip.
Version 1.4.2 (Full Build) - Note that Swift 5.7, 5.8, 5.8.1, 5.9, and 5.9.2 versions are now included in this zip.
Version 1.3.1 (Full Build) - Note that Swift 5.7, Swift 5.8, and Swift 5.8.1 versions are now included in this zip, along with the non-MagTek build. Choose the appropriate one for your development platform (Xcode 14.2, Xcode 14.3, or Xcode 14.3.1).
Version 1.2.0 (Full Build) - Note that Swift 5.7, Swift 5.8, and Swift 5.8.1 versions are now included in this zip, along with the non-MagTek build. Choose the appropriate one for your development platform (Xcode 14.2, Xcode 14.3, or Xcode 14..3.1). Additionally, this release is automatically Non-MagTek. Full releases with MagTek will resume at a later date.
Version 1.1.5.2 (Full Build) - Note that Swift 5.7, Swift 5.8, and Swift 5.8.1 versions are now included in this zip, along with the non-MagTek build. Choose the appropriate one for your development platform (Xcode 14.2, Xcode 14.3, or Xcode 14..3.1). Additionally, this release is automatically Non-MagTek. Full releases with MagTek will resume at a later date.
Version 1.1.5 (Full Build) (Non-MagTek Build)
Version 1.1.2 (Full Build)
Version 1.1.1.7 (Full Build)
Version 1.1.1 (Full Build) (Non-MagTek Build)
Version 1.1.0 (Full Build) (Non-MagTek Build)
Version 1.0.28.146 (Full Build) (Non-MagTek Build)
Android:
Version 1.4.3 (released with Maven)
Version 1.4.2 (released with Maven)
Version 1.4.1 (released with Maven)
Version 1.3.1 (released with Maven)
Version 1.2.0 (released with Maven)
Cordova:
React Native:
Version 1.4.13 (released with Maven)